


Video overlays (or video filters) enhance a film's look and feel. The beginning filmmaker looking to create a raw, textured look likely does not have a 35mm camera at their disposal like the director of photography, Darius Khondji, did for the film "The Lost City of Z."
"Film is an incredible treasure that lets you try lots of different tricks – some of them quite abusive – to make the picture look really old and obtain a wild and beautiful result," Khondji told Kodak.
For the novice filmmaker, a video filter digitally mimics what cinematographers like Khondji achieve through expert filming and processing techniques. A video overlay adds a layer of visual material post-production on top of the original footage to achieve the desired effect.
Why video overlays are used
Video overlays are one of the most commonly used techniques in video editing. An overlay means an effect or graphic design that's layered over an image or video. You can also add text, shapes, images, or even another video as overlays.
Video filters add visual interest. Some provide additional information.
Video overlays often guide viewers to focus on an area of a video, provide context, or communicate a specific mood. Video overlays hold several practical applications:
- Enhance the effect of a shot by adding an overlay like a light leak, snow, rain, or lens flares.
- Spotlight a character speaking a voiceover in a film by blurring or reducing the opacity of the background.
- Use text overlays to highlight key information in a newscast.
- Add a map or other visualization to communicate the location or context of the video.
- Insert a video-in-video overlay to directly highlight a clip and add context to it during a presentation.
- Communicate a product's name and features in a showcase video.
Whether it's a marketing video or documentary, overlays help create exciting and compelling videos. Using video filters helps accomplish what a lack of equipment or time won't allow.

Types of overlays
Video overlays provide endless possibilities. Sports broadcasts use lower-thirds overlays to show scores from other sporting events nationwide. That subscribe graphic in the bottom right corner of a YouTube video? It's a video overlay. Let's look at some of the most popular video overlays and their applications.
Light leaks
 A sampling of light leak videos available as overlays in WeVideo.
Light leak video overlays lend footage a vintage, dreamlike, or even a kinetic look. Light leaks are helpful for music videos, wedding films, or promotional videos. They enhance the mood and create visual interest. Filmmakers use light leak video filters for transition scenes, to emphasize certain emotional moments, or to simply add a nostalgic and warm feel to a film.
Ready to get started? Sign up for a free WeVideo account to easily create your first video.
By using light leak overlays in post-production, a filmmaker can manipulate the opacity, color, and movement of the layers so the video filter blends with the underlying footage — creating a custom, polished look.
Text overlays
Easily add text overlays to videos in WeVideo.
A text overlay conveys information directly on the video. Common text overlays include titles, subtitles, credits or captions. Documentarians use text overlays to introduce segments and experts; news channels provide context for stories using text overlays; and marketers find they're the perfect tool to highlight messages, call-to-actions, or promotional details.
Text overlays provide many creative possibilities, such as animations and transition effects that can be easily added using robust editing tools like WeVideo.
Picture in picture/video in video
 Example of a picture-in-picture overlay from a WeVideo webinar.
A picture-in-picture (PiP) overlay, also referred to as video-in-video, allows videographers to put one video within a small window over another. In filmmaking and video production, picture-in-picture overlays provide complementary information without interrupting the main content. PiP overlays are very popular in video tutorials where the subject's face often appears in a corner while the main screen demonstrates specific steps.
This technique helps to keep the audience engaged and understand what is happening on the screen. Video game streamers often use PiP to show their gameplay and a live feed of their reactions. PiP overlays are effective if carefully placed, sized, and synced.
WeVideo makes picture-in-picture easy:
- Add the videos you want displayed to the timeline.
- Open the Clip editor and resize.
- Drag the video overlay to the desired area.
That’s it!
Vignette
A vignette video overlay darkens the corners or edges of the frame, which creates a subtle visual effect to draw the viewer's focus into the center of the image. Vignettes can be used in narrative filmmaking to draw attention to a critical moment in a scene.
"The Godfather," directed by Francis Ford Coppola, uses vignettes to create a dramatic atmosphere that matches the film's overall feel.
Video via Paramount Movies
Adding a video overlay in WeVideo
With WeVideo's stock library and editing tools, adding a video overlay to your timeline is simple. WeVideo allows you to choose from several overlay options, including text, shapes and icons. You can also specify the color and font for your text overlays to match your branding – simply search for the overlay you’re looking for, and get started.
1. Start a new project
Start a new project in our video editor and import your footage.
2. Add clip(s) to your timeline

Drag your clip(s) onto the Video 1 track of your timeline. Then, create a new track (or use the pre-existing Text track) for your overlay. You can rename it, if you wish.
3. Select a video overlay

Click the Videos tab in order to access WeVideo's stock collection. Use the search bar to look for "video overlays." Or, if you know what you want, you can type something more specific like we did.
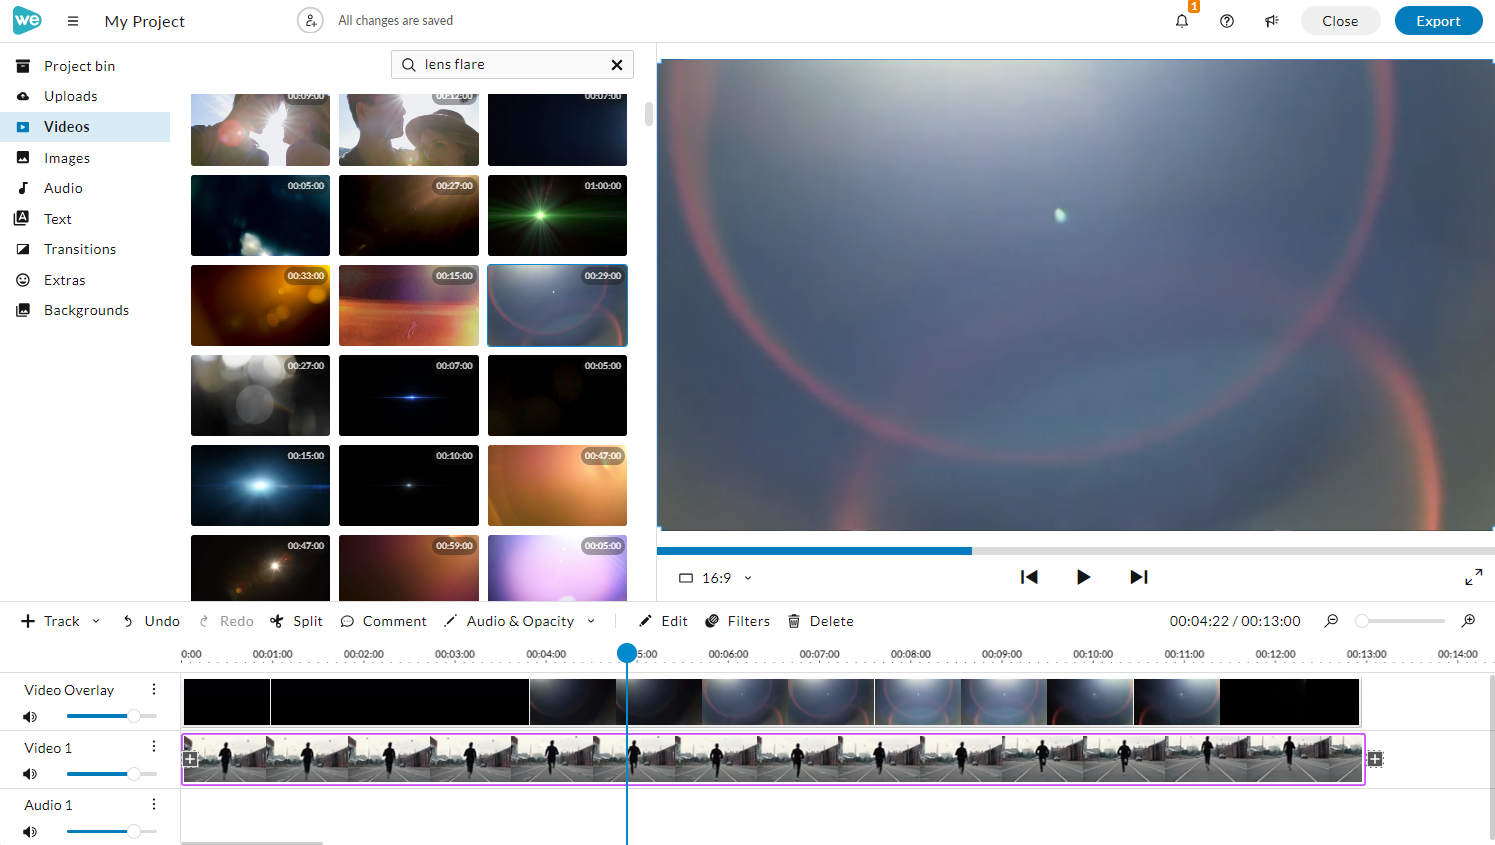
4. Adjust the opacity

Once your overlay is on the timeline, you'll want to adjust its opacity (transparency) so that you can see your original video underneath it.
To do so, select the overlay, click Audio and Opacity, then select Show opacity level. A green line will appear on your overlay. Use the movable white dot to adjust opacity. In the example above, we lowered it to 60 percent.
If you'd like to vary your transparency across the video, just click on the green line to add more white dots, then set them to whatever percentage of transparency you want. Additionally, you can double-click the clip and type in the desired percentage of opacity you’d like for the entire clip.
Learn more about using filters and overlays in WeVideo.
In a world full of competing video content where your videos need to stand out, adding a video filter (amongst other intentional effects) is a great way to capture a vibe, connect with your audience, and create something that leaves people wanting more.
Best practices for using video overlays and filters
Overlays and filters are enhancements. They're not meant to steal the show. Err toward subtlety. While video overlays and filters can bring a more cinematic look and feel to a movie, they can also be overdone. Use overlays with a clear purpose that matches the video's intention. Ask: Does this overlay align with the mood of the shot or scene?
Ready to get started? Sign up for a free WeVideo account to easily create your first video.
Find subtle date and time overlays to help set the scene while not intruding on the scene itself. Light leaks, film grain, or texture overlays may create a moody or vintage look. Add these sparingly and make sure they support the main footage instead of distracting from it.
It's always a good idea to create a list of filters to use in a film and order their usage within it. Why? Warm tones lend themselves well to nostalgic images; cooler tones help convey isolation or tension. If overlays get out of order, they can detract from the film's mood.
Also, ensure overlays and video filters match the resolution of the base footage so that no blurriness or pixelation occurs. Then, match the frame rate of any overlay to the footage to prevent stuttering and mismatched motion.
Following these best practices helps the beginning filmmaker use overlays and video filters to tell better visual stories, maintain a consistent look, and make their videos more professional.
Frequently asked questions
1. Where can I find high-quality video overlays for free?
WeVideo provides a vast collection of high-quality video overlays. With a repository of over a million images and videos, you can find overlays and filters like light leaks, film burns, glitch effects, and film grain. Our resource-rich platform is a go-to for all your video editing needs.
How do I create a transparent overlay for my video project?
To achieve this effect, you can use video editing software like WeVideo. Import the video clip you will use as the overlay, place the clip on top of the base video clip on the timeline, and then adjust the opacity of the overlay clip to make it transparent.
What are cinematic overlays, and how do they enhance video production?
Cinematic overlays are video effects that aim to bring a cinematic feel to your videos. They include elements like film grain, light leaks, and other effects that mimic the look of vintage film. These effects can add depth, texture, and atmosphere to your videos, making them more visually engaging and cinematic. Incorporating cinematic overlays into your video editing can elevate the quality and impact of your content.
WeVideo not only provides both the overlays and video filters needed to create powerful shots, it provides the editing tools to make them great. Video overlays are one of the most commonly used techniques in video editing. An overlay adds an extra layer of content on top of a video. It can be anything — another video, text, an image, or a compelling video filter.
Video overlays help filmmakers achieve fantastic visual storytelling in film, even when equipment and time are not on their side.